Preparation work
Remove Glass - Door - Upper
| | | Care Point: | This repair is applicable to glass and polycarbonate upper door glass'.
|
| Care Point: | The replacement glass/polycarbonate upper door glass may have a dimensional or colour difference to the removed part. If this is the case the upper door glass/polycarbonate should be replaced as a pair.
|
| Care Point: | Risk of damage. Apply protection to the body panels to prevent damage.
|
| Care Point: | Always replace the clips. Refer to the Spare Parts Catalogue (SPC) for part numbers.
|
| | | 1. | Remove the upper door trim.
| | | 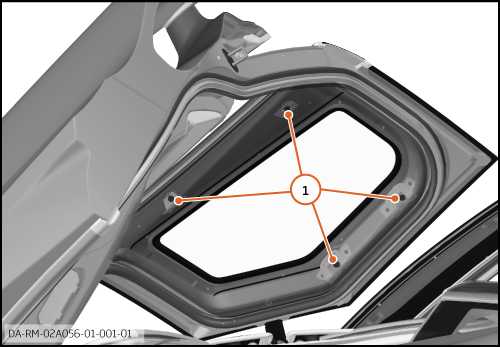
|
| | | Care Point: | Risk of damage: We recommend a fibre cord is used to remove all bonded glass.
|
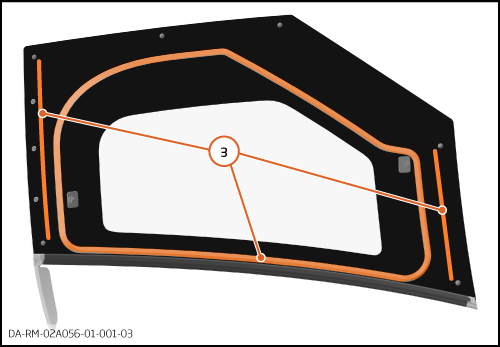
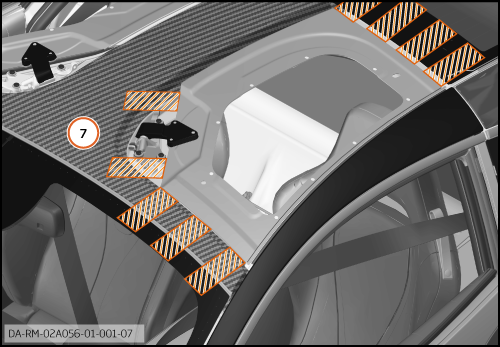
| | | 2. | Carefully cut out the upper door glass/polycarbonate. The Illustration (3) shows the sealant bond paths.
| | | 3. | Remove the glass/polycarbonate upper door glass.
| | | 
|
| Care Point: | The replacement glass/polycarbonate upper door glass may have a dimensional or colour difference to the removed part. If this is the case the upper door glass/polycarbonate should be replaced as a pair.
|
| Care Point: | During inspection, if a loose, misplaced or defective upper door hinge cover is found it must be replaced. Refer to SPC for part numbers.
|
| Care Point: | Risk of damage. Make sure the painted surface does not get damaged.
|
| Care Point: | When fitting a polycarbonate panel leave a minimum 1mm high adhesive bead on the vehicle adhesive bond path. This will provide good adhesion for the kent screenfix 90.
|
Install Glass - Door - Upper
| 1. | Make sure you remove all the loose adhesive from the vehicle adhesive bond path.
| | |
|
| 2. | Apply a suction tool (4) to the upper door glass/polycarbonate.
| | | 3. | Install the upper door glass/polycarbonate before bonding to make sure the alignment is correct.
| | | 4. | | | | 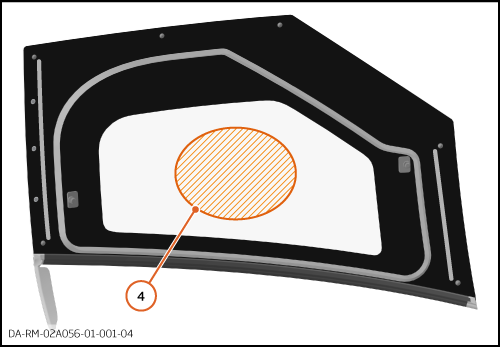
|
| | | Care Point: | Do the step that follows if more adjustment is required to align the upper door glass/polycarbonate.
|
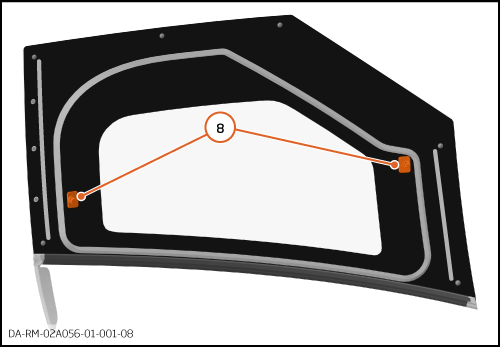
| | | 5. | Discard the locator pins (8) from the upper door glass/polycarbonate.
| | | | | Care Point: | When you apply cleaner and promoter, obey the manufacturer's flash times.
|
| | | 6. | Use a cloth not with lint to clean the upper door glass/polycarbonate and vehicle adhesive bond paths. Use BETACLEAN 3900.
| | | | | | | 7. | If you install an upper door glass, apply Sika Primer 206 G+P to the upper door glass and vehicle adhesive bond paths.
| | | 8. | If you install an upper door polycarbonate, apply Betaprime 5404 to the upper door polycarbonate..
| | | 
|
| | | Care Point: | If the upper door glass/polycarbonate gap and flush measurements do not meet specification after adjustment of the adjacent panels it may be necessary to adjust the upper door glass/polycarbonate position when bonding to bring it within specification.
|
| | | 9. | Apply 2 inch diameter masking tape, adhesive side up, to the inside of the door as shown in illustration (7).
| | | 
|
| | | Care Point: | Kent screenfix 90 is a modified Silicon adhesive and can be applied over remaining Sika Tack OEM adhesives. Sika Tack OEM will not adhere directly to cured Kent screenfix 90 and should be cleaned away before application.
|
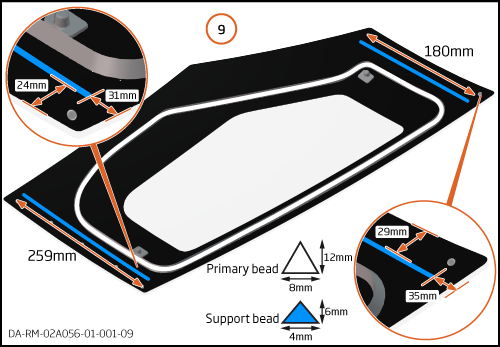
| Care Point: | The primary bead is identified by a white line on the new upper door glass/polycarbonate. The support beads must be applied in the correct location.
|
| Care Point: | When you apply adhesive, obey the manufacturer's flash times.
|
| | | 10. | Apply Sika Tack OEM to the upper door glass as shown in illustration (9).
Apply Kent Screenfix 90 to the upper door polycarbonate as shown in illustration (9).
Make sure that the bead heights, widths and measurements are correct.
| | | | | Care Point: | Make sure there are no voids in the sealant bead.
|
| | | 11. | Install the glass/polycarbonate upper door glass in position.
| | | | | | | 12. | Press the glass/polycarbonate upper door glass into place until the required gap and flush is achieved.
| | | 
|
| | | Care Point: | The procedure below must be claimed separately if you make a warranty claim.
|
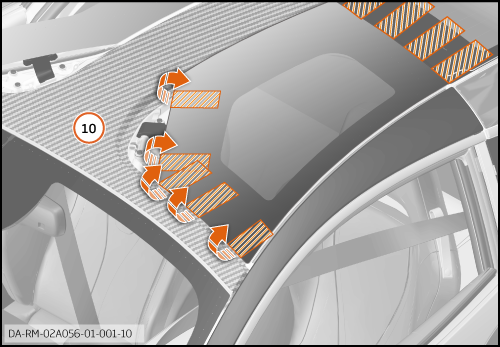
| | | 13. | Tighten the masking tape as shown in the illustration (10) to provide the correct gap and flush measurements for the upper door glass/polycarbonate.
| | | | | Care Point: | For glass upper door glass adhesives, obey the manufacturers recommendation before you continue.
|
| Care Point: | For upper door polycarbonate adhesives, you must wait a minimum of 24 hours before you continue.
|
| Care Point: | You must not open the door until the adhesive has cured.
|
| | | 14. | Allow the adhesive the correct time to cure.
| | | 
|
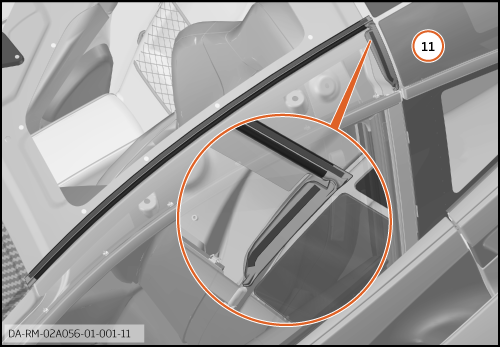
| 15. | With the door slightly open, remove the adhesive backing from the seal, upper door glass/polycarbonate and attach it to the inside of the door frame as shown in the illustration (11).
| | | 16. | Install the components in reverse order.
| | | 
|